
Do you come back from an amazing trip only to realize your travel photos suck?
You really thought you’d done it right and swore you took great photos.
But when you load them onto your computer you realize that they’re not so fabulous after all.
And you’re even embarrassed to share them.
Well I’m here to help.
I’m going to dish out some awesome tips on how to take better travel photos.
The nice thing is these tips will not only help you take exceptional travel photos but better photos period.
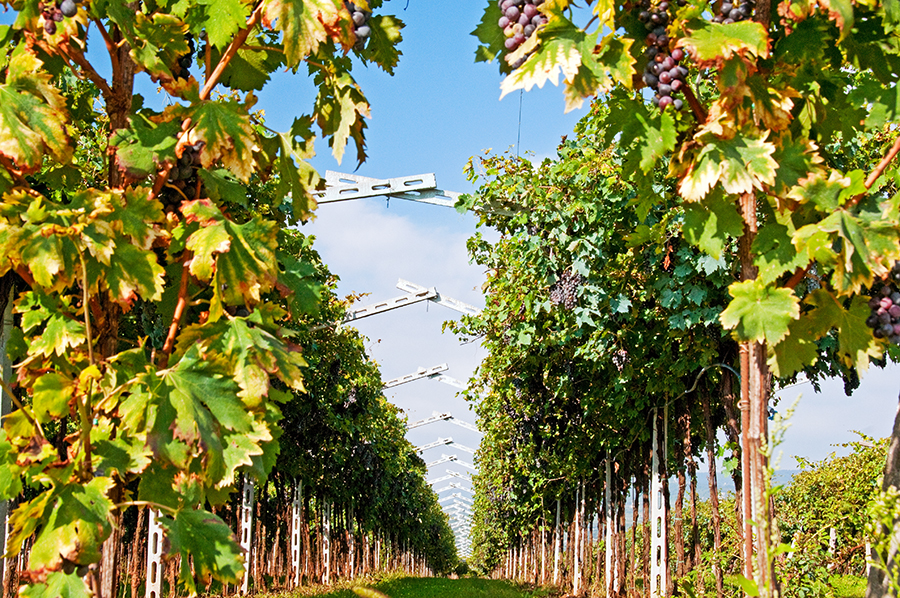
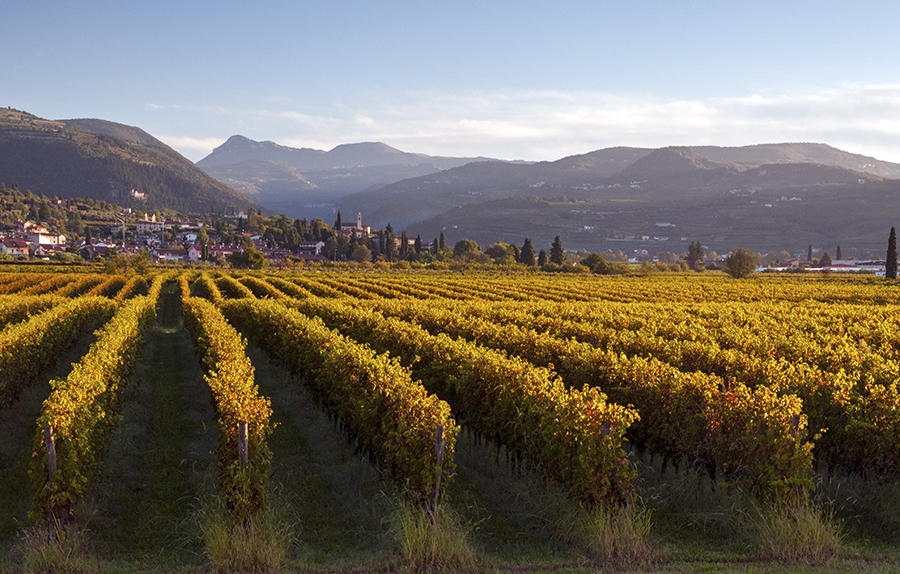
By crouching down low, I got this unique perspective on the grapevines in Italy.
Tip 1: Get closer
Zoom in or physically move closer if possible.
The biggest mistake we make is backing off.
Get in there.
Get up close and personal.
There is a time and place for backing off to get the “grand scenic.”
But there is also a time and place for getting in just a wee bit closer.
And when we get in closer we get better travel photos.
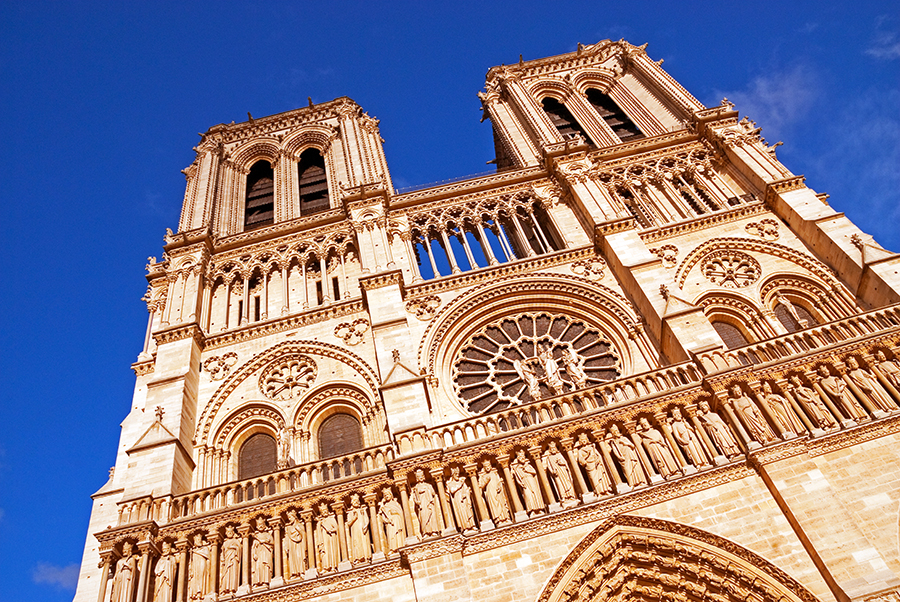
I love this image of the façade of Notre Dame Cathedral in Paris. I chose an interesting angle and I zoomed in on the upper part of it rather than trying to photograph the entire thing.
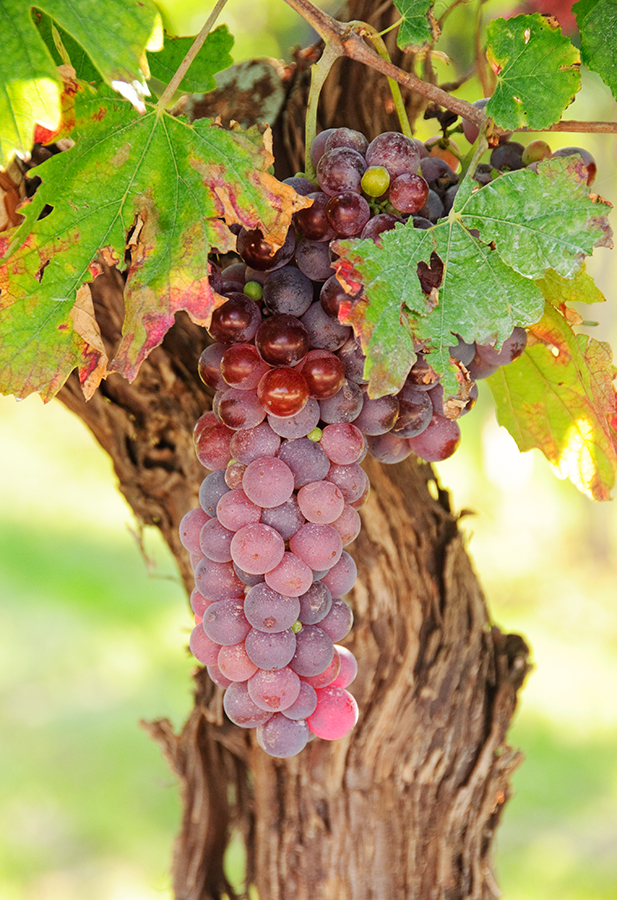
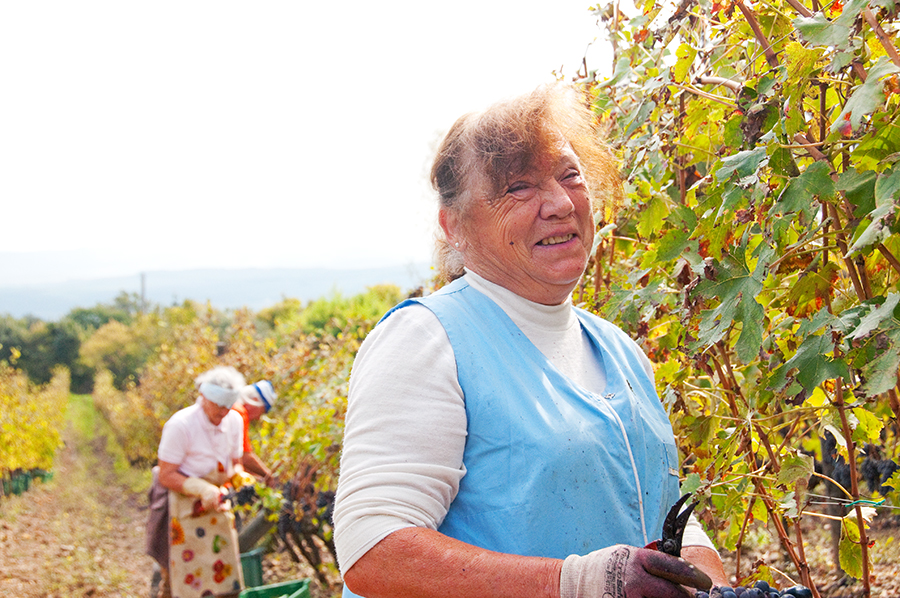
By both walking in closer and zooming in with my lens, I created this image of grapes on the vine in Italy. I zoomed in on just one cluster and I think the result is fab!

This friendly baby cow was just on the other side of the fence. Because he was curious and came up to me, I was able to use my wide angle lens to get up close and get this fun photo.
Tip 2: Declutter
This tip goes with the above and I call it “declutter.”
Too many times you don’t notice that tree to the left or the wires way up high.
Look around at your full screen and not just your subject that is most likely toward the center of your screen.
Get rid of unwanted “stuff” in your travel photo.
Often if you zoom in or get closer you’ll declutter.
Sometimes you may need to move a bit to the left or right.
And sometimes you may have to change your angle slightly by crouching down low or standing up just a wee bit higher.
Do these things if it’s safe to do so.
No photo is worth getting hurt!!
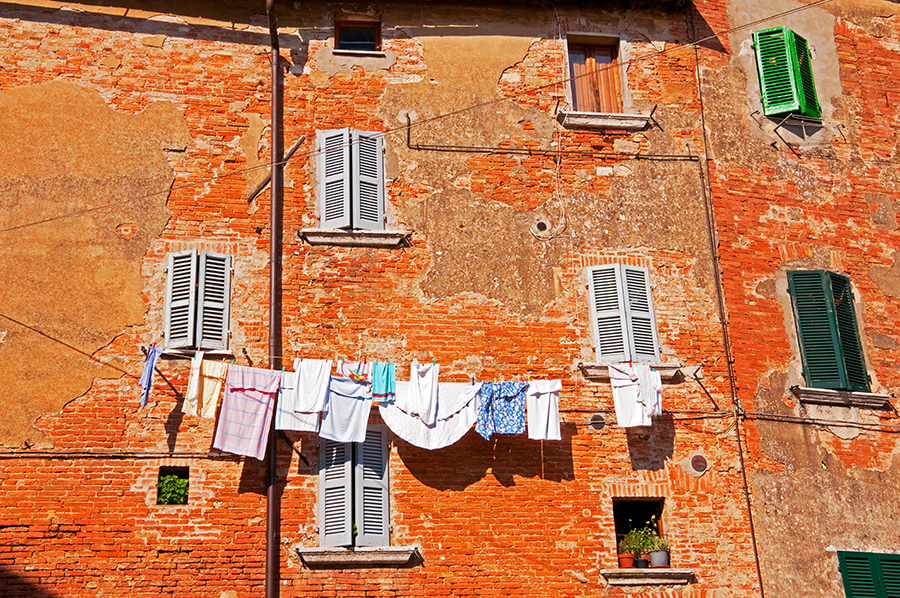
This is a pretty good effort at decluttering and zooming in. I wanted to get the laundry hanging out against this warm, old brick wall. While I couldn’t eliminate all the distractions, often you can crop a bit after you’ve taken the image. I don’t like the shadow in the left-hand corner and the shadows at the very top. So I often crop it just a bit.
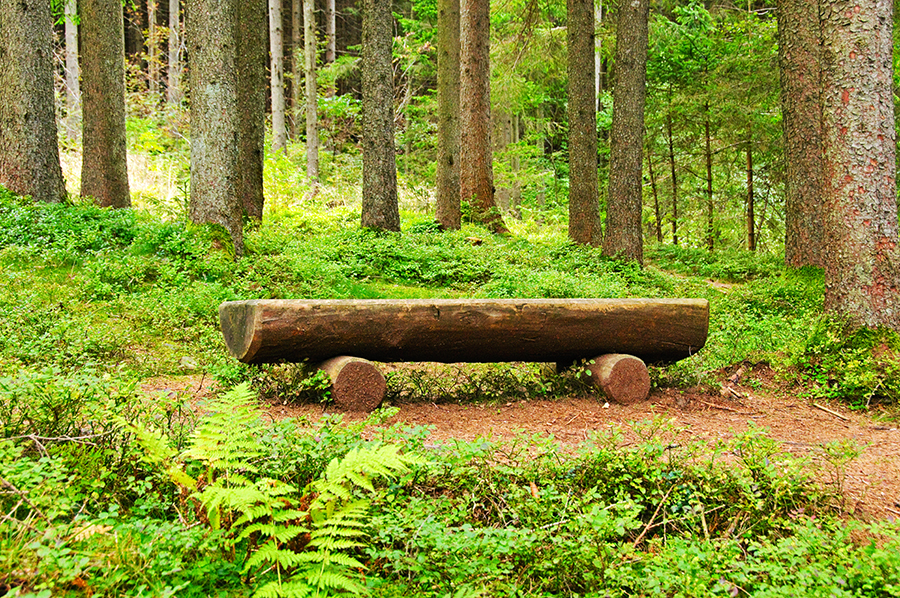
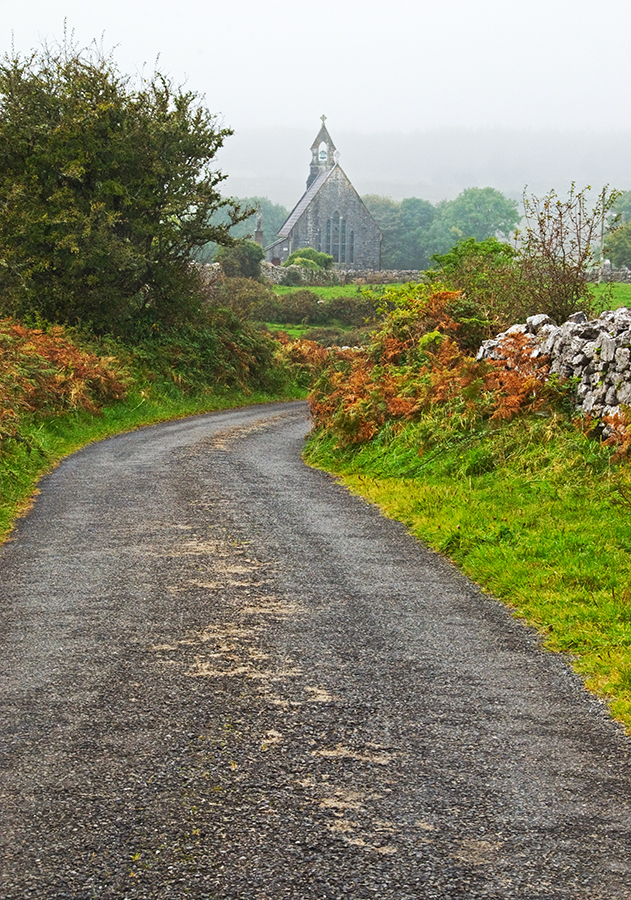
This is a good example of decluttering. There were a lot of distracting elements with lots of trees all around and foliage in the foreground. I wanted to draw attention to the bench, but to also ensure that I gave a sense of place. So I moved around to the right spot and zoomed in to get rid of too many distracting elements.
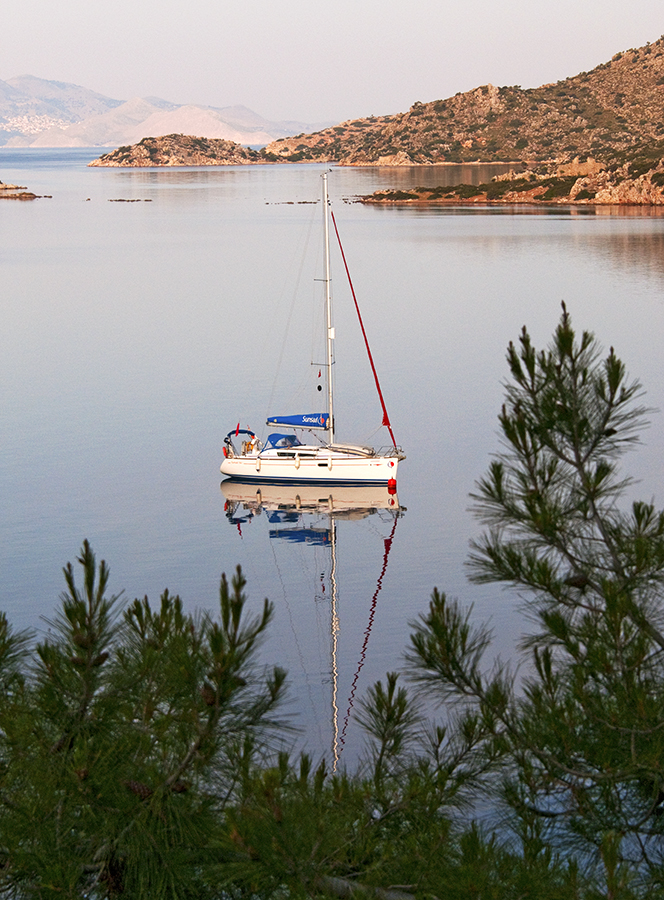
Some images are hard to get because we can’t get rid of unwanted elements or we can’t move to the best spot. So we do the best we can. This is one such image. The light is gorgeous, the sea so calm creating the perfect reflection. But I couldn’t get rid of the trees. So I found the best vantage point possible and was happy with the result.
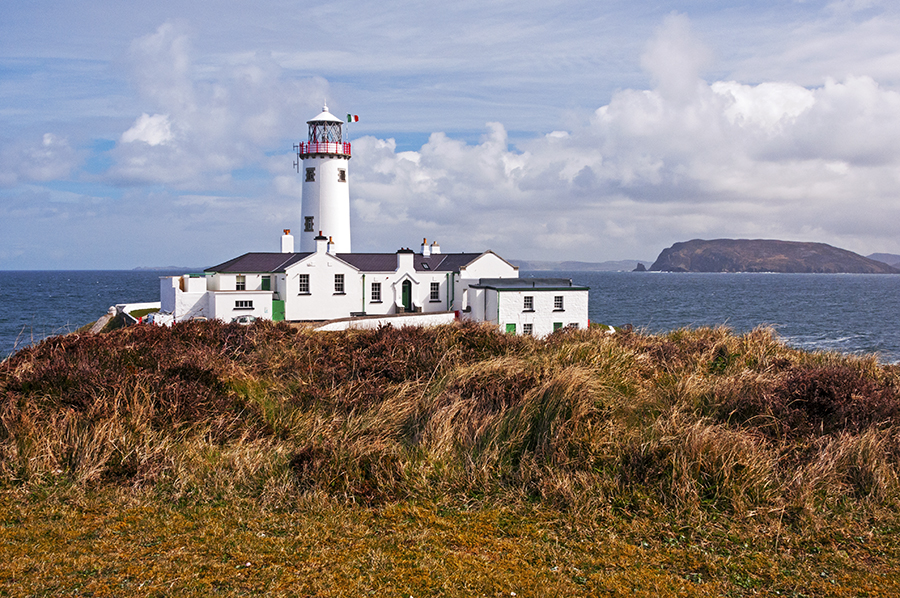
This is a great example of decluttering. I was driving on the road and could see the lighthouse off in the distance with the tall grass. But there were lots of other things going on in the foreground. So I walked around until I found the right spot and zoomed in so the lighthouse was the focus, but I still had some of the background elements in the shot to give the image a sense of place and perspective.
Tip 3: Notice the light as you take travel photos
Photography literally means “painting with light.”
So always be aware of the light — whether it’s the sun, the clouds or some form of artificial light.
This is the most important aspect of taking amazing photos.
What direction is the light coming from?
Usually photos that are backlit — the sun or light is behind the subject — don’t turn out very well unless you’re going for some sort of creative/artistic look.
Light directly overhead is typically not flattering to people. So try to avoid midday images of your family and friends.
Try to keep the light either directly behind you or over one of your shoulders.
Early morning light — especially right before sunrise and in the first hour after sunrise — can be really beautiful.
And late evening light — in the hour or 2 before sunset and in those minutes just after the sun goes down — can be simply stunning.
We photographers call these times the “golden hour” as the light takes on a warm cast and it’s often a magical time to take travel photos — or any kind of photos.
But don’t discount overcast days.
This “soft” light is flattering for people photos.
And it makes colors pop more. In fact flowers look gorgeous under this kind of light.
Fog or misty days can be lovely as well as often there’s an almost ethereal quality to the light that can transfer to your travel photos.
Play with the light at home before you make your trip and see what you can do in all kinds of light.
You’ll be pleasantly surprised!
There’s nothing like early morning light — just as the sun comes up — to capture that golden hour light.
Overcast and misty days often convey the mood of a place. So don’t discount photographing in less than “ideal” weather.
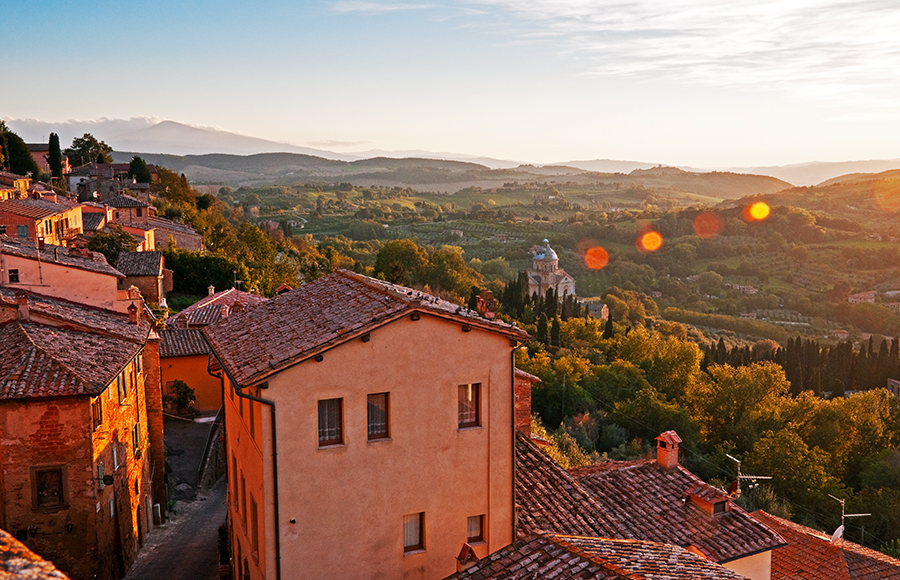
The time around sunset can be magical with very warm light. And although those spots are not technically correct, I did allow them as I loved the effect on the image. So sometimes it’s okay to break the rules!
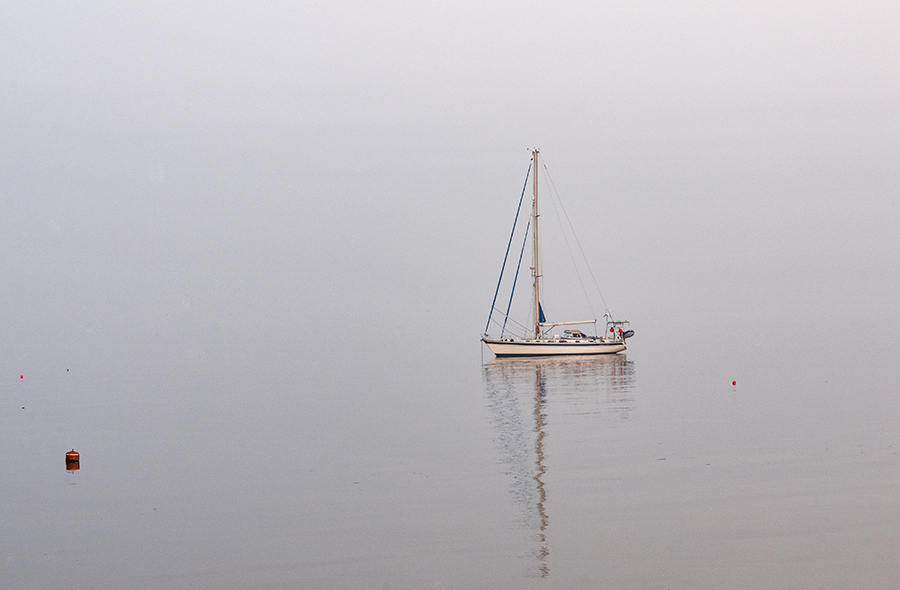
I love this image of this moored sailboat in the foggy Welsh weather. There’s a certain eeriness to the image, don’t you think?
This is a great example of using late day light that is in a good spot. The light is coming from over my right shoulder so it creates shadows to the left side thus giving this image depth and perception.
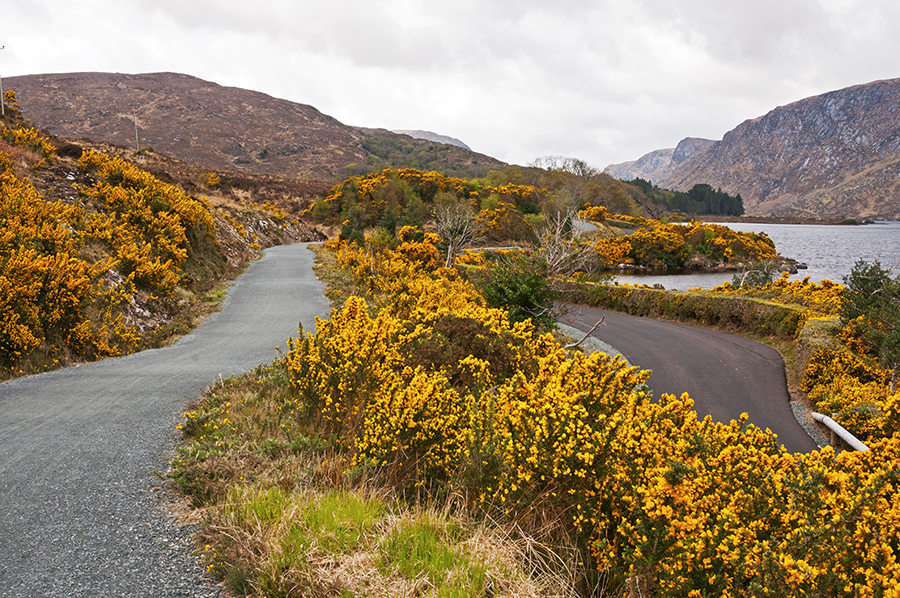
Although it’s an overcast day, notice how the colors of the gorse bushes pop under this soft light.
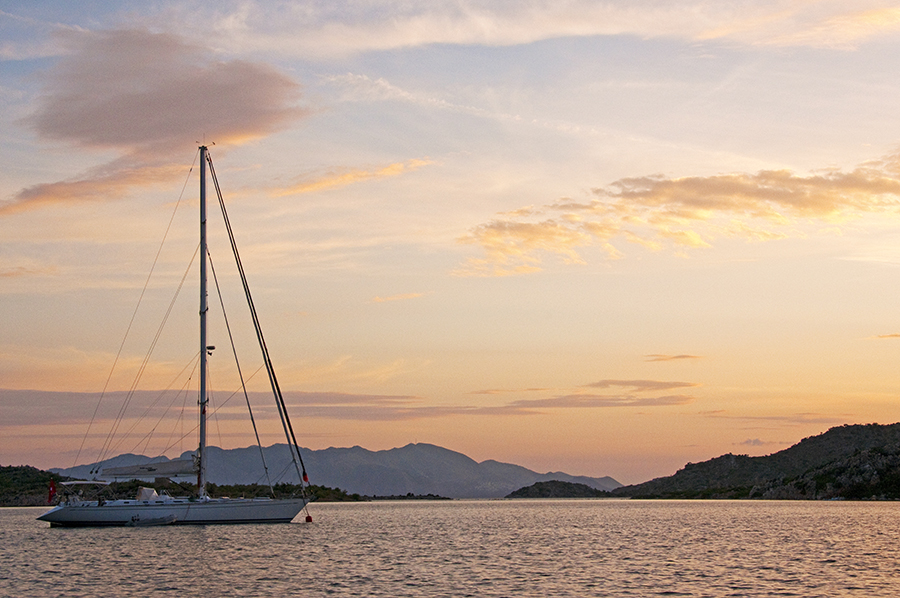
Photographing just after sunset is a wonderful time to capture the gorgeous light.
Tip 4: Put people in your travel photos
This can be a dicey situation.
When it comes to photographing locals, please be respectful.
Don’t take travel photos of children without permission.
I would also say it’s best to get permission from adults.
Many folks are okay with you taking their picture but some are not.
Respect this.
If they so “no” then do not take the photo.
The other part of this tip involves having people in your travel photos for a sense of scale or a sense of place.
As I walked the West Highland Way in Scotland last year, I loved it when there was someone on the trail in front of me.
I would take photos as that person walked with a mountain in front of them or as they walked through a field.
Having that person — or a few people — gives some perspective to your travel photos.
Now your family or travel companion is another story.
By all means, take lots of photos of them.
And yes, selfies are fine.
Just don’t go overboard and try to photograph you and your spouse near a wild animal.
Not cool.
And not safe!
The lads I walked with on the final day of the West Highland Way. By putting people into your images, you get a sense of place.
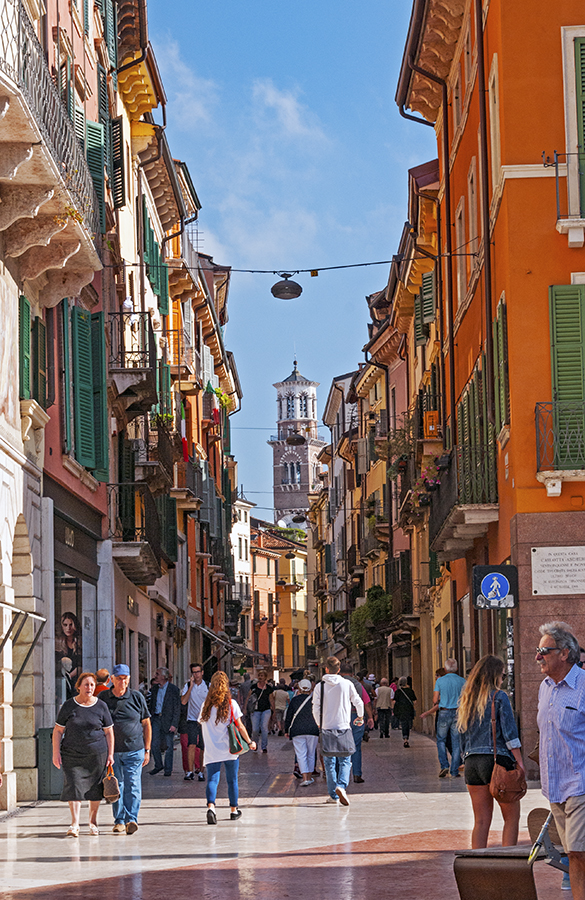
This image of the vibrant city of Verona works because of the people. We often want to get rid of the people in our images. But often the they add to the picture. In this case, the bold colors and the people walking along this street give a sense of the energy and liveliness of Verona.
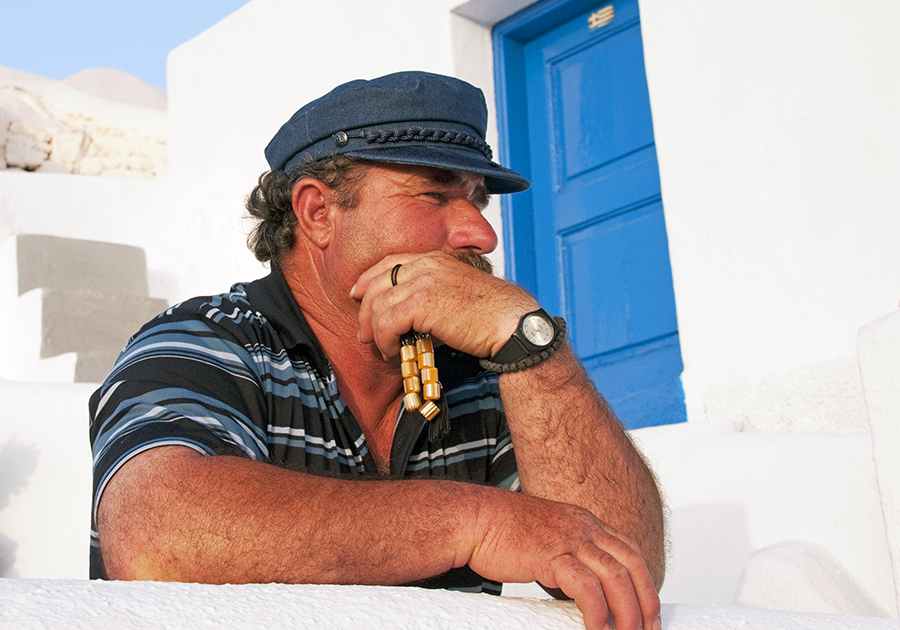
I asked this man if I could take his picture and he gave me just a small nod of yes. So I took just one or 2 images. It’s always been one of my favorites from my time on the Greek Island of Santorini. And on a note, I asked another man a few days prior if I could take his picture. He said no. So I respected his decision.
Tip 5: Don’t center your subject
I see this all the time with the main subject dead center.
Stop!
Put the main subject a bit to the left or right and up or down a bit.
Visually, it’s more interesting.
I’m not going to go into great detail about how your eye moves and the rule of thirds, but try it.
See what happens.
Yes, there are times when centering your subject does work.
But get out of this habit.
The result will be more appealing travel photos.
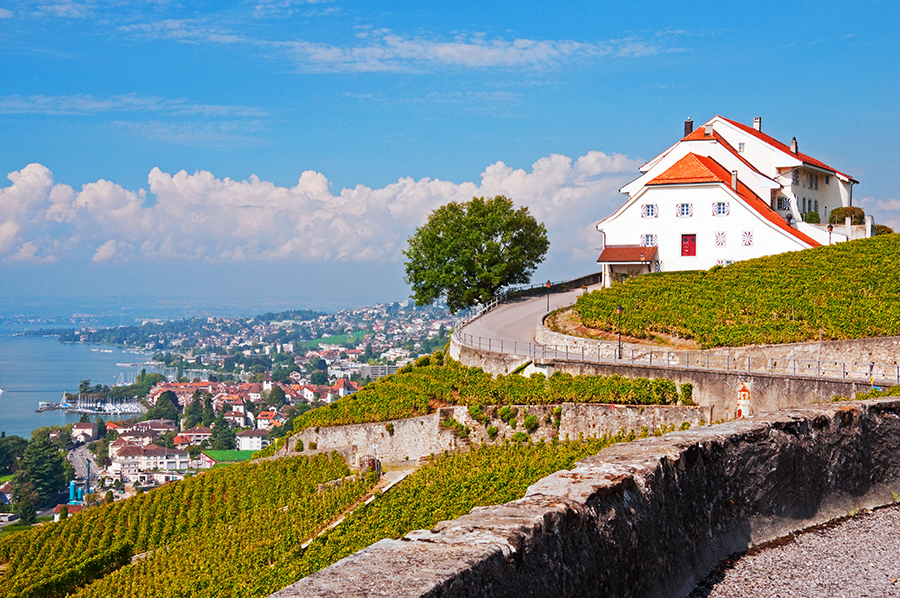
I wanted to photograph the white house. Instead of putting it into the center of the frame, I put it to the upper right as I wanted to also give it a sense of place along the shores of Lake Geneva.
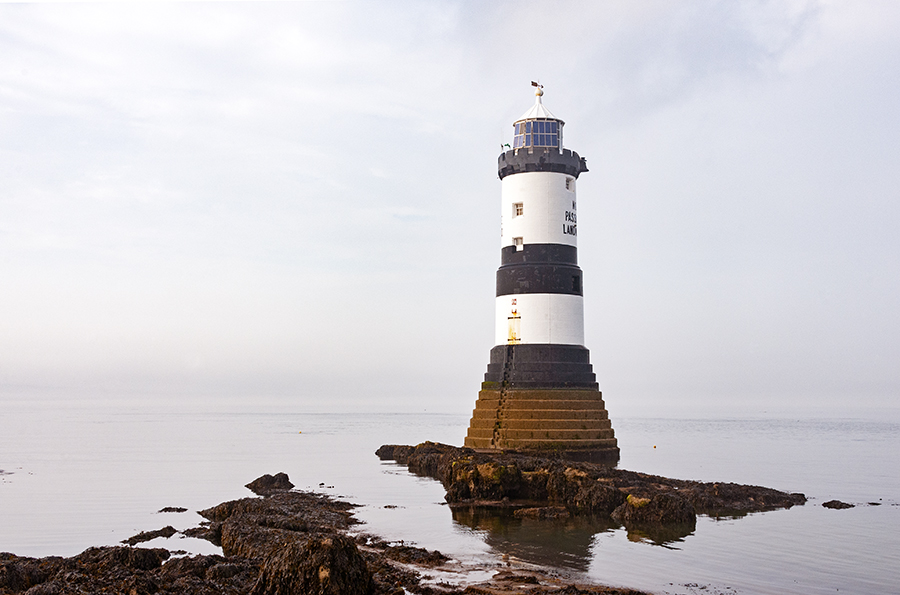
This image of Penmon Lighthouse in Wales is just slightly off-centered which works better than putting it right in the center of the frame.
Not only is this a good people photo, it also shows that by NOT putting your subject in the center, you get a more appealing picture.
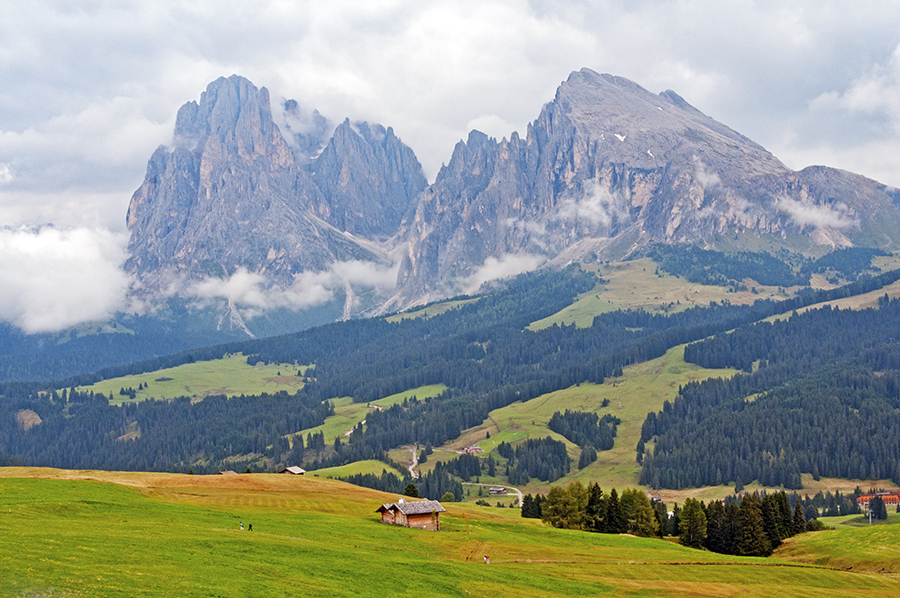
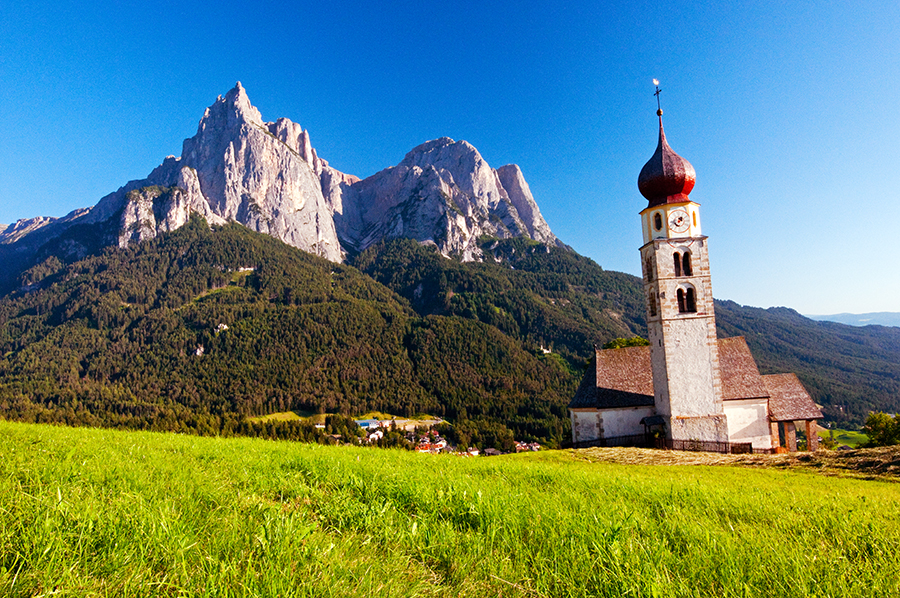
Notice that the peaks are in the upper third of this image and not right in the center. And I’m still getting a great image under overcast skies.
There are more tips!
I could actually teach an entire course on how to take amazing travel photos.
And I may just do this if the interest is there.
But for now, these 5 tips will help you improve your photography skills.
And you’ll end up with travel photos you can be proud of.
So get out there and snap away!
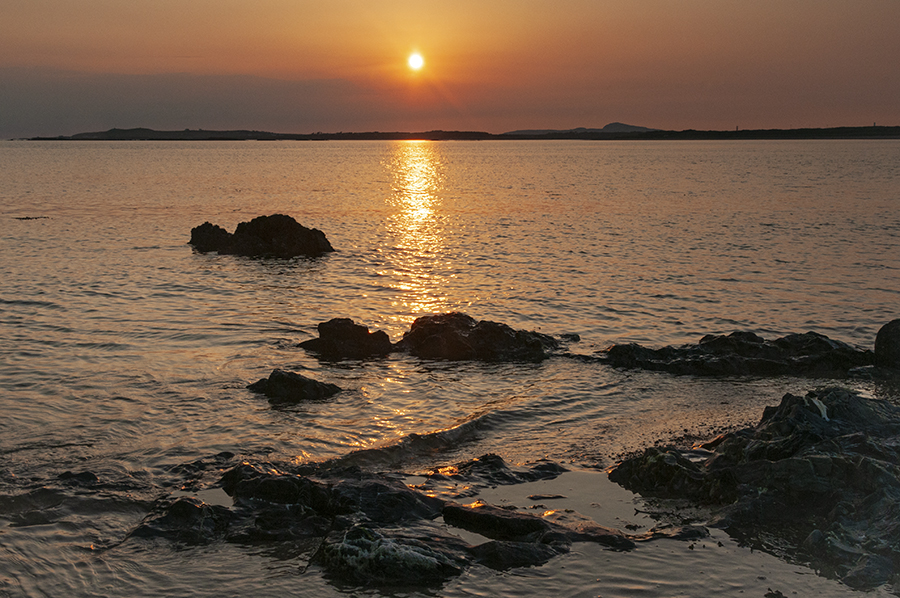
Sunset is always a good time to take some amazing travel photos!
What’s in my camera bag:
Nikon D300s DSLR
AF-S Nikkor 28-300mm 3.5-5.6 ED
AF-S Nikkor 18-200 3.5-5.6 DX
AF-S Nikkor 16-35 1.4 ED
I’m also a fan of using a polarizer filter when appropriate as well as a graduated neutral density filter.


Such beautiful photos and great tips. Would you reccommend the Nikon D300s DSLR for someone that just likes the automatic setting for taking pictures? I want a good small / medium camera with a view finder not the screen to point and click.
I would recommend a “lesser” DSLR model as you probably wouldn’t want to spend that kind of money for all the bells and whistles. But I would recommend Nikon.
Useful tips! Thanks for sharing!
You’re welcome, Anna!
Enjoyed reading this post. These are basic tips but so very important. If you’re a beginner photographer or just an occasional taker of photos on your holidays, it’s really hard to train your eye to get the “perfect shot”. These simple tips are a reminder of what you should be doing everytime you look through the viewfinder and managing your own expectations of your photo’s outcome. Like you said…there are TONS of additional tips but I feel you’ve highlighted the key ones to step up your photography game.
I’m looking forward to reading more from you!
Thanks,Talia! I’ll be sure to offer up some more tips in the near future.
Great tips! I can tell you know what you are talking about by looking at your photos. Some of these I already knew and have been working on, but my take away from your post is the decluttering. I will try to think about when I am taking pictures.
Glad the post helped, Anisa!
Awesome tips and tricks for great photos!! I sometimes struggle with the light… I take pictures throughout the entire day depending on if there is anything interesting, but then the light does strange things and there are weird shadows all over the pics. Some of them I keep as a memory but don´t use it for sharing. But that´s ok… Thanks for sharing your tips!
I’m the same way. Sometimes you are only that one spot at that one time of day and the pics don’t turn out quite as you’d hoped. But you have the images as a memory.
Great useful tips for beginner photographers! Lovely photos, thanks for sharing! Really like the foggy Welsh boat!
Thanks. I love that photo of the boat in Wales too.
Basic but very important tips. I do some mistakes, I have to admit it… I will try my best to follow your advice!
There’s no such thing as a mistake. Just ways to create slightly better and more eye catching photos.
I’m always looking to better my photography skills! Thank you for these tips. I always love not putting my subject in the center. It makes for an interesting photo!
I so agree! Off centered subjects make better images.
Great advice, really useful. I’ll try to implement them on my next trip 🙂
Hope you do!
Love your advice about photographing people! I love photos of locals (like your man in Santorini) as it captures the spirit of a place so well! Really great advice – thanks so much!
You’re welcome Lauren. I agree that people really make great subject for travel photos.